

Custom Shoes Design Guidelines
Steps to Design Your Custom Shoes
Unleash your creativity with custom sneaker designer feature that lets you design footwear like never before. Dive into the world of customize sneakers online and design footwear that's a true reflection of you. Design your dream shoes with our platform that empowers you to build your own shoes. With our tools, your footwear dreams become reality. Embrace the art of how to design shoes and showcase your personality through your footwear.
3 Steps to design your Shoes and Sneakers Online
A) Choose your Shoes Style and Upload your Print File
B) Design in the Mockup Generator
C) Save Your Design & Place Order
A) Upload Your Print File
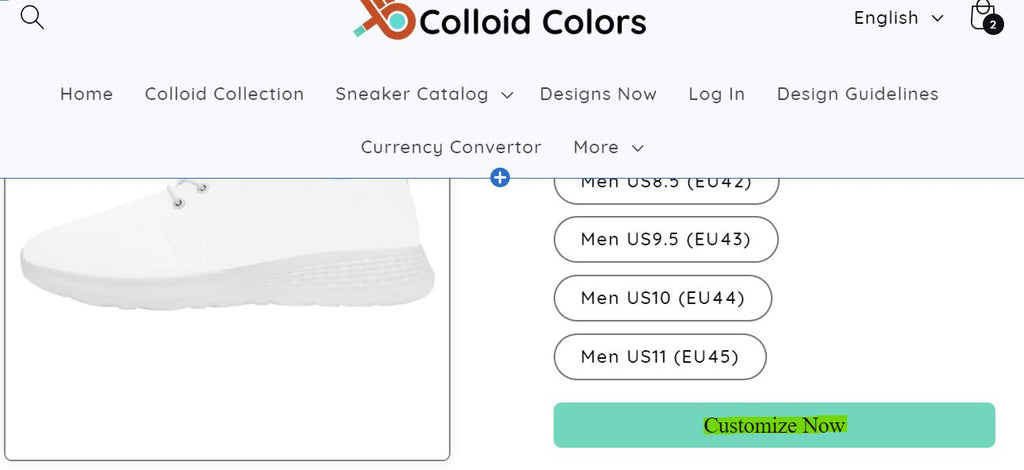
1.To personalize your sneaker, simply click the "Customize now" option on the product detail page. This will grant you access to our mockup generator.
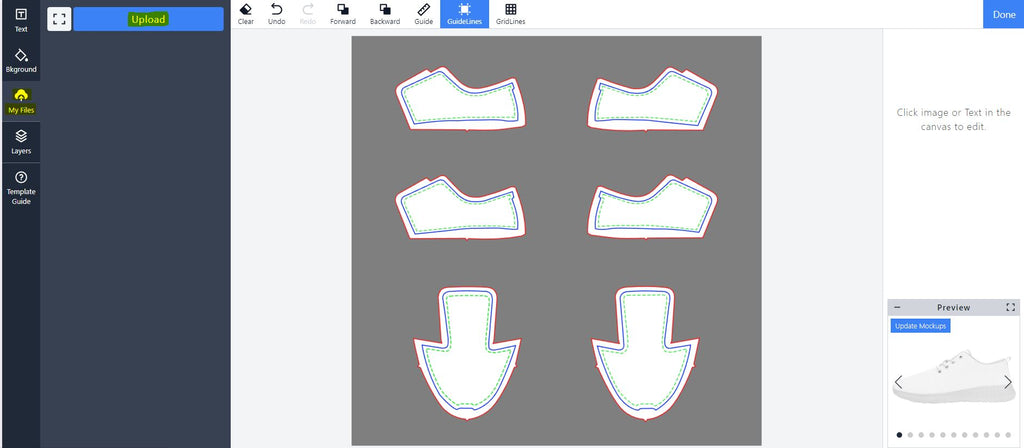
The mockup generator is a powerful designing tool that allows you to create stunning mockup images for your custom sneaker designs. By utilizing this tool, you can easily design your Sneakers using your own print files, which can include photos, images, drawings, characters, pictures, artwork, text or logos. The mockup images generated through this tool can be conveniently downloaded or saved as templates.
2.Select "My files" in mockup generator and upload your desired print file that you wish to have printed on the product. Before uploading, please review the print file requirements outlined in the next section .
Print File Requirements and Impact on Print Quality
To ensure optimal print quality, Colloid Colors has specific requirements for the print files that can be uploaded. Here are the guidelines:
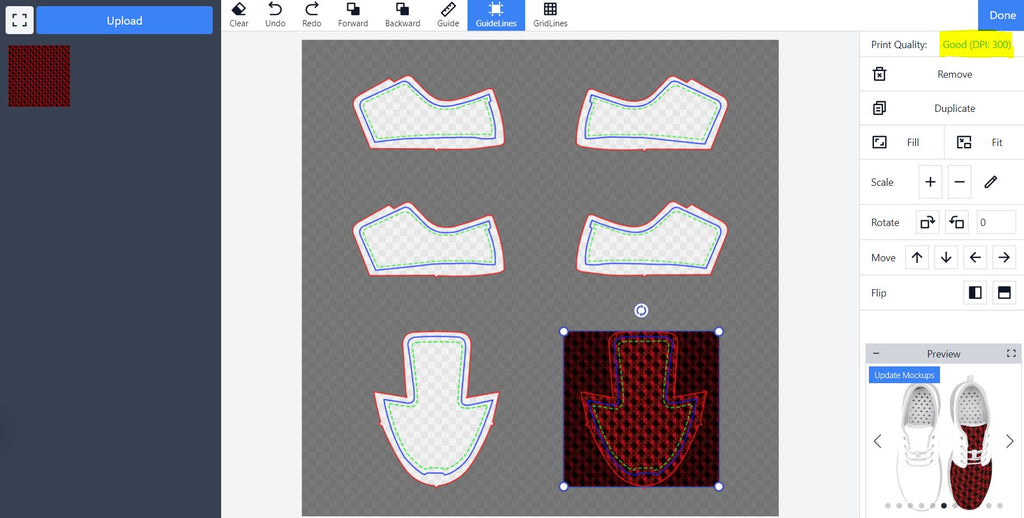
1.Accepted File Formats - Only files in JPG, JPEG, and PNG formats can be uploaded.
2.File Size and Resolution Limits - Bulk uploading of images is supported, but each file should be within 100 MB.
3.Minimum DPI Requirement - Files should have a minimum resolution of 150 dpi. Pixel in the image should be limited to 30,000px.
4.Print quality is determined by the DPI (dots per inch) of the design area. Here are some guidelines to consider:
5.Print Quality Categories:
- High: DPI over 150.
- Average: DPI ranging from 80 to 150.
- Low: DPI below 80.
Importance of DPI
Insufficient DPI can result in pixelated designs. While 150 dpi is acceptable, if you desire the highest clarity, sharpness, and intricate details in your prints, it is recommended to use a file size of 2000 x 2000px with 300dpi.Various software tools, including Adobe Photoshop and other affordable options, can help you meet the minimum quality requirements.
(Checking File Size and Resolution - If you're unsure about the size or width/height of a file, you can check its properties to obtain the necessary information)
Checking Print Quality and DPI in Mockup Generator
The top right corner of the designing page will provide suggestions regarding print quality and DPI. You can refer to this information to ensure your design meets the desired guidelines.
Dealing with "Bad Print Quality & Low DPI" Alert
1.Scale the Design Down:
Attempt to scale down the design, which can improve file resolution.
2.Improve File Resolution:
Utilize suitable tools or graphics programs to enhance the file resolution.
3.Consider Using a Different Design:
Choose an alternative design that meets the specifications.
(Note: When uploading an image to the Designer, it may be scaled to a smaller size for online mockup previews. However, the original production file of the appropriate size will be safely uploaded to our system.)
Additional Suggestions
1.Remove Background and Use PNG Format if required.
Before uploading your file to the Mockup generator, In some cases , you may find it beneficial to remove the print file background using suitable tools or graphics programs. This step helps make your design stand out from the base color of the sneakers. Additionally, consider uploading your design in PNG format for optimal transparency and clarity.
2.Use Your Own Photos, Logos, Designs, or Artwork:
It is recommended to use your own original photos, logos, designs, or artwork to ensure uniqueness and personalization. Please also refer to our Copyright Policy and ensure that you comply with all applicable copyright laws.
3.Printers works best with CMYK color model.
If you are planning to upload your design created by RGB model, then We recommend using some online RGB to CMYK converter to check which colors of your design are out of CMYK color space and fix it. Please try to avoid neon colors in your design as they may not be adequately supported by printers.
Order Fulfillment Guarantee:
Colloid Colors aims to provide timely order fulfillment. However, it is important to note that if the production of an order is delayed due to non-compliance with these guidelines, our order fulfillment guarantee may not be applicable. By following the provided guidelines and ensuring your design meets the required specifications, you can help ensure a smooth and efficient fulfillment process for your customized product.
Will fabric or material affect print quality?
Here's how different sneaker fabrics/materials can affect the printed design to some extent :
Canvas:
- Canvas is a sturdy and tightly-knitted fabric commonly used in sneakers.
- Any kind of print can be applied to canvas, but it's important to note that the design colors may appear less bright compared to other fabrics.
- It is not recommended to design with shiny colors like gold on canvas fabric.
Polyurethane (PU) / Leather :
- Polyurethane, often known as PU, is a smooth and leather-textured fabric used in sneakers.
- This fabric type allows for excellent color restoration, ensuring that the design colors appear vibrant and true to their original form.
- Both light and dark colors display well on PU fabric, providing versatility for designing.
Mesh:
- Mesh fabric is characterized by its smooth and reticular (net-like) texture.
- Similar to PU fabric, mesh allows for optimal color restoration, ensuring that the design colors appear vibrant and true.
- Both light and dark colors display well on mesh fabric, making it suitable for various design choices.
B) Design in the Mockup Generator
In the mockup generator, you can drag the picture to your desired location on the canvas and select it to make adjustments. By dragging the white dots around the picture, you can easily resize it to the desired size. As you make these changes, you can see real-time previews of the product in the lower right box, allowing you to toggle between different product views and perspectives. This way, you can find the perfect placement and size for your picture, ensuring your design looks great on the sneakers in the mockup.

The mockup generator offers color guidelines to assist designers in scaling and positioning design images accurately, ensuring that the final product reflects their intended vision. These color guidelines help maintain consistency and ensure that the product you design looks exactly as you envisioned it. By following below guidelines, you can achieve the desired Print representation and ensure that your design translates seamlessly onto the product in the mockup.
Red - Safe Zone
The red line represents the Safe Zone for your sneaker design. It is essential to keep the important parts of your design within this area at all times. To prevent any cropping of the pattern, it is recommended to fill the product section completely with your design using full-bleed images (A full-bleed image refers to designs that extend beyond the edges of the canvas design area, preventing any blank spaces after stitching or cutting).
During production, the machine will print and crop along this red line.By adhering to this guideline, you can guarantee that your design is reproduced without any unintended alterations.
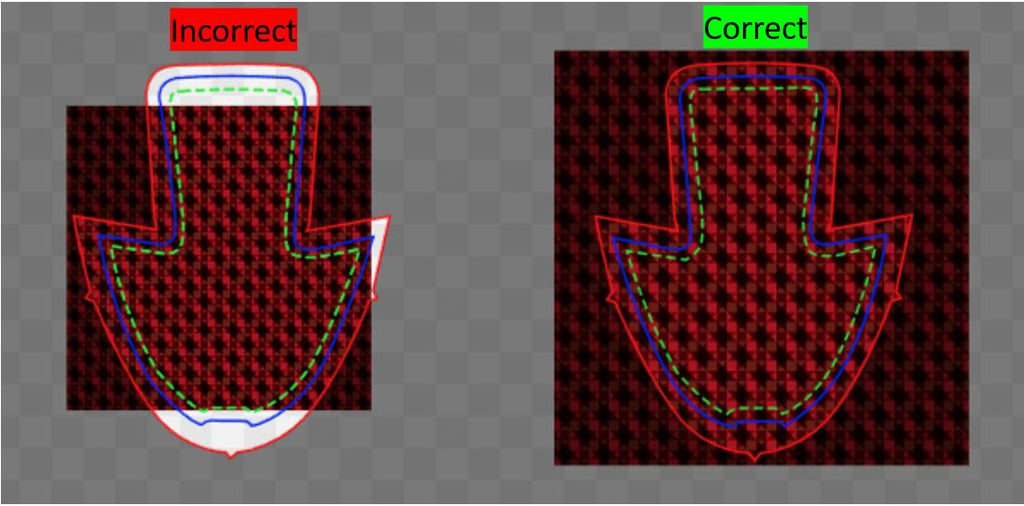
The safe print area represents the actual display area of the design pattern so to avoid white edges or the pattern being cut off, it is recommended to place essential elements such as logos or text within the safety zone as much as possible to avoid cut off in the final product.
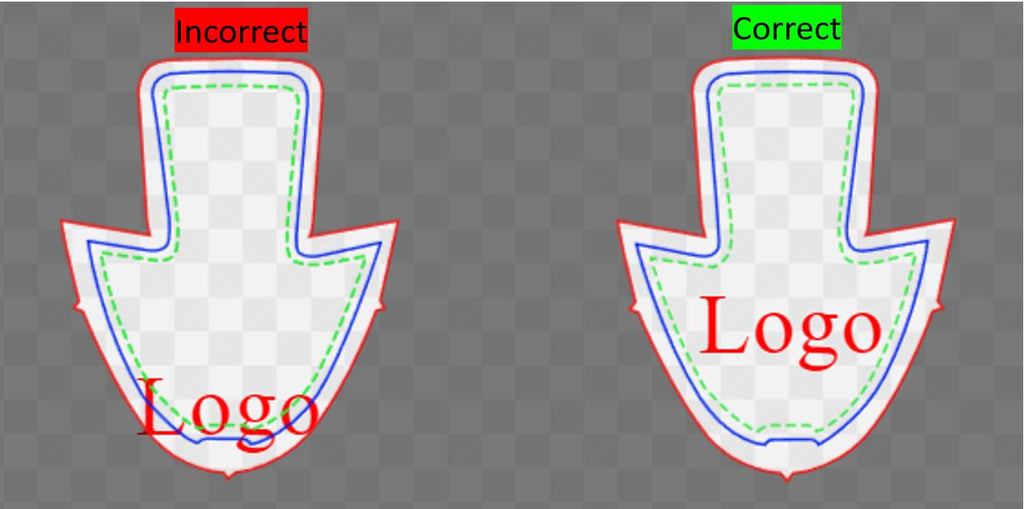
Light - Print Zone
The Light area represents the inner Print Zone of the product where trimming occurs during fulfillment and printing. It is important to ensure that your design images extend to the full Print Zone to avoid any white gaps along the edges of the product. Ideally, your design image should go beyond the Print Zone to ensure a seamless appearance.
- To achieve a perfect and beautiful end product, it is recommended to place the major parts of your design image within the Safe Zone while also filling up the Print Zone.
- When designing, it is crucial to keep the logo or any important elements at a safe distance from the stitching line. Leave enough margin between the logo and stitching line to ensure that they do not overlap.
- Additionally, when using print file templates, make sure to delete any guide layers before saving the files to avoid their appearance on the print.
Functions in Mockup Generator
The design tool offers several functions to enhance your designing experience:
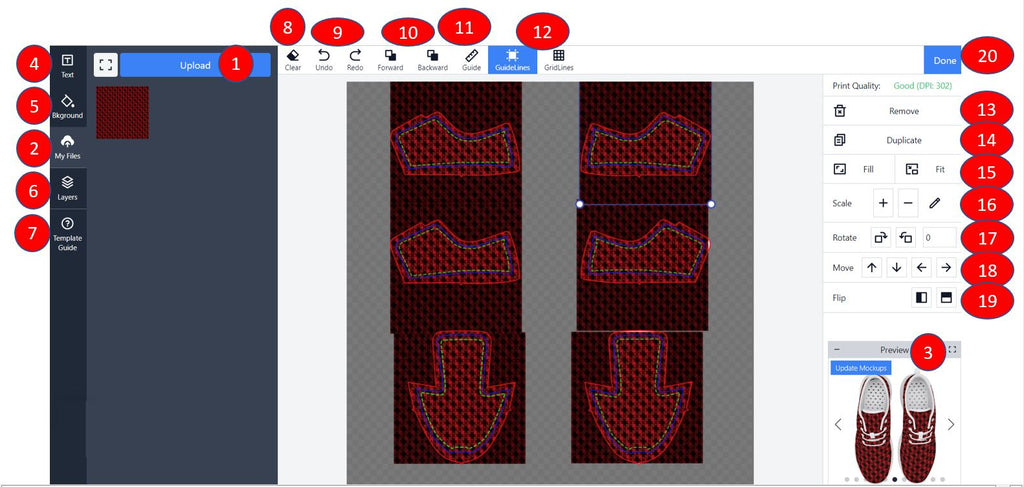
- Upload allows you to upload and display your print file on the current layer.
- My files displays all the print files you have previously uploaded.
- Preview provides real-time mockup previews of your products.
- Text enables you to add text to the current layer.
- Background allows you to change the base color of the product.
- Layer lets you edit the design layers.
- Template Guide allows you to download the PSD template.
- Clear clears the current design work.
- Undo & Redo lets you undo or restore the previous action.
- Forward & Backward adjusts the relative positions of the print files.
- Guide helps you add guides for object placement or alignment.
- Guideline & Gridlines can be hidden or displayed.
- Remove removes the last uploaded layer.
- Duplicate duplicates the current design layer.
- Fit enables or disables fitting the design layer to the entire mockup window.
- Scale adjusts the size of the selected design layer.
- Rotate rotates the selected design layer.
- Move moves the design layer vertically or horizontally.
- Flip flips the design layer.
- Done represents proceeding to final design preview before placing an order.
Intensity of Blending
When you click on preview tab , You will see option of selecting Intensity of blending on top left of window.
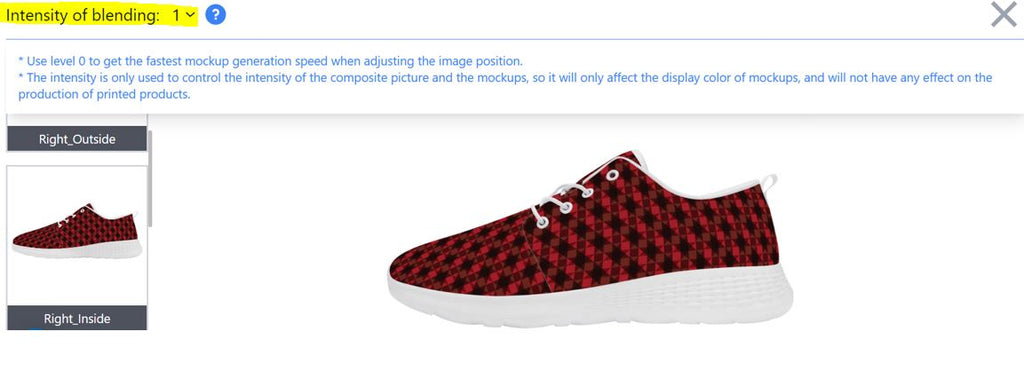
- The intensity of the blending numbers can be adjusted to modify the quality of mockup images. A lower blending value reduces the time required to generate the mockup, while a higher value improves the quality. By default, the blending intensity is set to 0 to expedite the design process. However, once your design is finalized, you can increase the blending intensity to obtain high-quality mockups for presentation.
- The function of adjusting the intensity of blending does not alter your design or the final product itself. Instead, it enhances the design process and adds a realistic and textured appearance only to your design mockup. Different patterns with varying brightness levels may require different intensity values to achieve the desired level of realism. For light-colored patterns, a recommended intensity value is 2 or 3, as higher values can make the mockup appear dark. For instance, a level 4 intensity may result in a greyish appearance. It is advisable to use an intensity value of less than 3 for light color designs.
- Please note that these adjustments are specific to achieving a more realistic mockup and do not impact the actual product. However, using excessively high intensity levels may result in discrepancies between the actual products and the mockups. Therefore, it is advisable to use this feature judiciously to maintain consistency between the mockup and the final product.
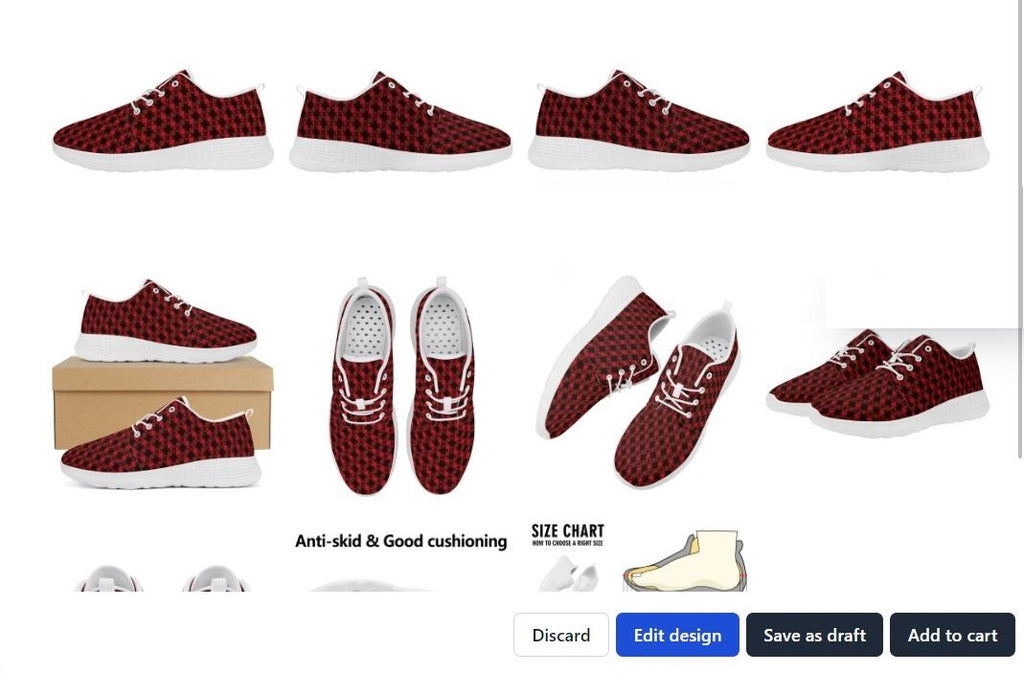
C) Save Your Design & Place Order
Once you have completed your design & its final review , you can either save it by clicking on the "Save as Draft " button and order it later or proceed to add it in your cart to place an order by clicking on the "Add to Cart" button.
From there, you can review your order details, provide any necessary information, and proceed with the checkout procedure to finalize your purchase.
If you have any questions or concerns regarding our Design guidelines, please feel free to contact our customer support team at support@colloidcolors.com.
We are thrilled to transform your Custom Shoe Design into reality!
June 1st, 2023..